|
The
process of making a curved patchbox hinge has
occasionally come up in discussions, both in classes and
on the web, and in at least one printed source on rifle
making you may have found the statement that a curved hinge will not function.
While it
is true that many original makers did use hinges that
were essentially straight, there are also old rifles
where the hinge is curved to match the shape of the
stock. After making my first rifle with a straight hinge
I decided that curved hinges were more pleasing to my
eye and I have been using them on my rifles since the
late 1960s. I have also taught a few classes on mount
making during the NMLRA Seminars at WKU and show students in
those classes how to make and fit curved hinges.
While
there is no substitute for hands-on, supervised
training, I hope this web page will provide enough basic
information to allow someone wanting to learn to make a
box that matches the flow of their stock to get a good
start on teaching themselves.
________________________________
The steps
involved are pretty much the same for any type of hinge
that is made as part of the sheet metal finial and door
rather than being soldered on. (Cast boxes are made by
several very different processes.)
I have
never mastered the process of making boxes out of the
extremely thin sheet seen on some original rifles or
casting my own sheet brass. Although Wallace
Gusler cast the sheet brass for the mounts in his
Gunsmith of Williamsburg movie, it was a real
challenge and he ended up casting sheet about an 1/8
inch thick and hammering it out thinner. I suspect that
is why cast boxes are often fairly thick and have the
hinges cast in and drilled for the pin.
THE
PROCESS:
I usually
start with sheet brass that is either 16 gauge (.051”)
or 14 gauge (.064”). (The thicker material is what I
would generally use on earlier rifles.) Anneal the brass
and rough out rectangles for the door and finial. I make
them both a bit oversize and don’t bother with any
layout until after the hinges are fit.
For the
hinge pins I have used everything from coat hanger wire
to drill rod. Now I prefer the spring steel wire sold as
“music wire” in many hobby shops and the better hardware
stores. Pick a wire that is as close in diameter to the
thickness of the brass.
A lot of
modern makers like to use some sort of jig or form to
help bend the hinges but I have never seen the need for
any tools other than a hammer and a vise for this step.
While it is true that 18th-century sheet
metal workers like tin and silversmiths used a lot of
dies, I have never found any evidence that a gunsmith
had a special tool for what to me is a very simple step.
Fold the
annealed brass back on itself to begin forming the
barrel of the hinge. The amount of overlap in not
critical and as you will see in later pictures I have
been in the habit of filing the lap inside the box door
into a decorative shape. (I guess you’d call this a shop
detail of the Colonial Williamsburg shop since many of
the rifles made there have some form of this
decoration.)
The hinge
is formed around the pin and you need to make sure that
the pin stays all the way out against the inside of the
bend. See the three drawings below. Going from the
second drawing to the third is accomplished by driving
the outside of the hinge down into the correctly spaced
gap between the jaws of a vise. That also thins the
lapped over section a bit as it moves the pin so it
aligns with the sheet of the door or finial. Depending
on how much you have work hardened the brass, it may
need to be annealed again during this to get a sharp
corner where the exterior of the door or finial buts
against the barrel.
Drawings 1, 2, & 3 showing major steps in forming the
hinge around the pin.
Once the
hinge is formed both halves are bent to match the curve
of the stock. Anneal the brass again first. Depending on
the style, period, and length of the door this curve can
vary from slight to fairly pronounced. If the stock is a
form where the wrist carries back into the butt, the
curve may be asymmetrical with a sharper bend in the top
toward the comb. To avoid dinging up the hinge barrel, I
add this bend by hammering on the inside and driving the
brass down into a curve cut in the end grain of a piece
of wood. Hammer marks on interior surfaces are normal in
period work.
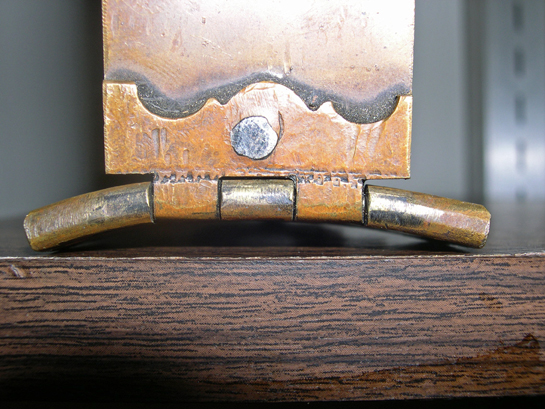
Drawings
four and five show the bent hinge of a finial. The curve
of the door is simply matched to the finial by eyeball.
Now you can pull the pins out of the door and finial.
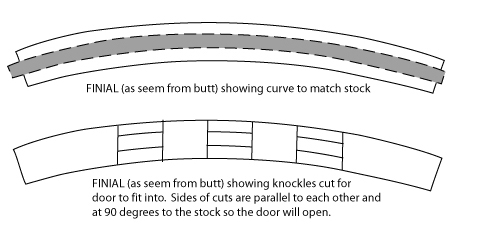
Drawings 4 & 5 showing the finial hinge curved to
match the stock (pin in gray) and the three female
knuckles cut to receive the door (pin shown but not
colored).
The reason
a curved hinge works is shown in the fifth drawing.
Waiting until after it is bent to cut the knuckles
allows them to be cut perpendicular to the stock and
parallel to each other. All the mating surfaces of the
two halves of the hinge are in the same plane as the
opening motion of the door. If the knuckles were cut
before bending the hinge to fit the stock there would be
gaps at the top and binding on the inside after the bend
was added.
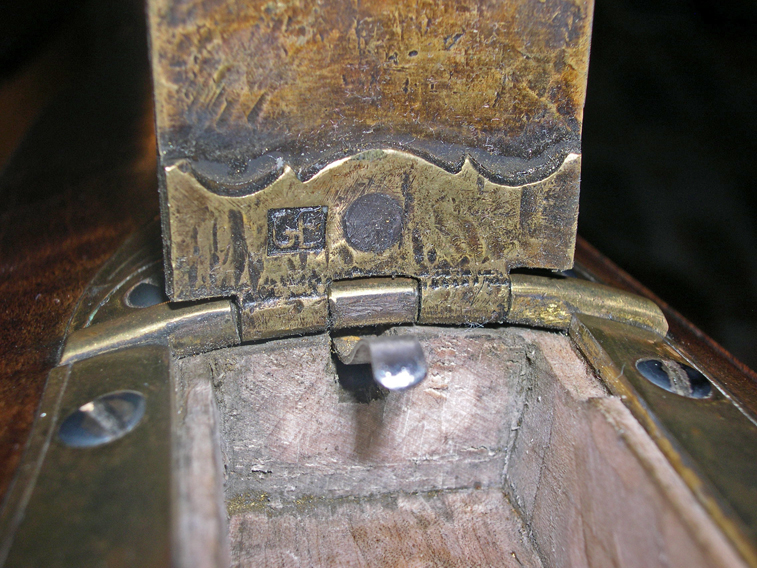
Most of
the boxes I have made have two knuckles on the door but
the number really doesn’t matter. I show three in
drawings 6 & 7 and in the unfinished box below. The 7th
drawing shows a tiny bit of relief cut at the bottom of
each knuckle. These have two purposes; they free up the
hinge to open wider, and they make fitting the door to
the finial easier.
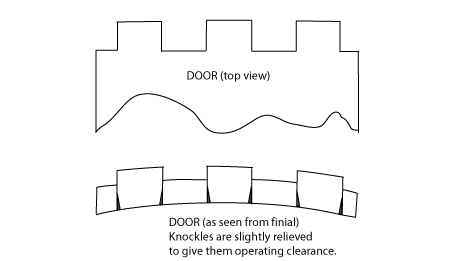
Drawings 6 & 7 -- pin not shown.
For an early rifle a short, wide door and a short
finial could be required. On a wide door three knuckles
are stronger than two.
This blank box was made while I was teaching a class
at WKU and I have never had an occasion to use it.
I make the
door knuckles first then scribe and inlet them into the
finial working from the outside inward. As soon as the
door is in enough for the pin holes to begin to line up,
I file a long taper on the finial pin and drive it in to
draw the door up tightly against the finial. Carpenters
doing timber frame construction use a long steel pin for
this same purpose of drawing joints together but I
cannot recall the name they give the tool.
If it is
fit well the hinge will barely move when first
completely assembled but a little filing on the exterior
and a couple of drops of oil will allow you to work it
back and forth until it moves freely. I save the final
dressing of the outside of the hinge until after it is
inlet in the stock and everything is being filed down to
match the wood and brass.
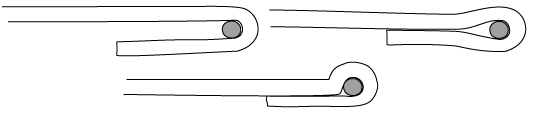
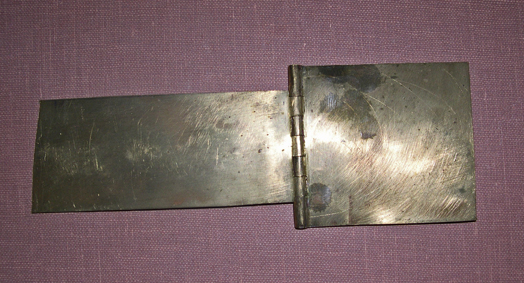
(top)
Below are some pictures of curved hinges:
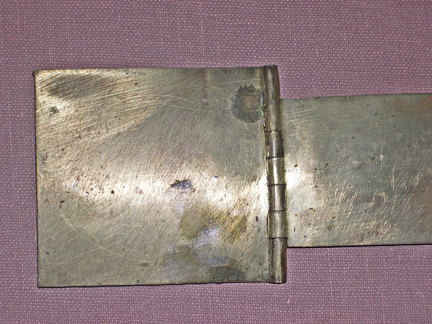
This box was made about 1995 and I have kept it as a
demo piece to use in the classroom. Obviously it has
never been on a rifle. The finial is a very stylized
version of a Valley of Virginia "spiral flower." When
finished it would have been similar to this one
valley_rifle.htm
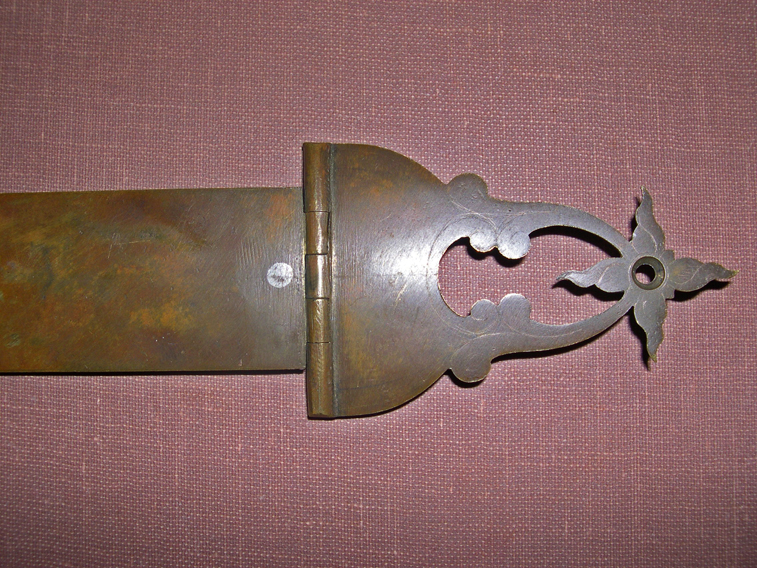
This hinge is more curved toward the comb side
because it was intended for a rifle with the cove of the
wrist carried back into the butt.
This is the box on my current hunting rifle.
2002_rifle.htm

(top) |